Readerware Newsletter - April 2016

Welcome to the Readerware® Newsletter
Readerware 3.51 Released
 A lot of new features and improvements in this Readerware release.
We have added a new Contributor Editor, you can now edit author, artist, actor lists just like other list. Right click in the field and select Edit from the popup menu. You can add, update and delete contributors, you can merge contributors and clean up unused contributors.
Have a new Windows 10 2-in-1 computer? Readerware now includes improved support for Windows tablet mode.
Readerware 3.51 adds other features and resolves a number of issues, including:
We swapped out the date picker component we had been using in Readerware. The new one has much better support for different formats.
Many spine label improvements, added new label stock, portrait and landscape printing and new options.
You can now choose which images Readerware extracts in auto-catalog.
Readerware will now check for duplicate ASINs, avoid duplicates when cataloging your Kindle eBooks.
Also in this newsletter a look at cataloging vinyl in Readerware 3 (Music) and the new look for your music listings.
A full list of the changes included in Readerware 3.52 is available in the release notes. You can also access the release notes from Readerware itself, select the Help->Release notes menu item.
We recommend that everyone upgrade to Readerware 3.51.
Contributor Editor
 As most of you know you can easily edit the list fields like Category, Format, Series etc. Right click in the field and select Edit from the popup menu. The list editor lets you easily clean up unused entries, merge entries as well as add, update and delete entries.
Most of you know that, but "How do I remove an unwanted item from a list?" is still one of the most asked questions. Being able to access the list editor right from the list itself as you clean up a book entry is very convenient, but having to right click is not that obvious. In this release we have added a new Database Lists item to the Edit menu. You can now edit any list by selecting it from the Edit menu. You can still access the editor by right clicking in the field of course.
The List Editor has been part of the product since the first release of Readerware 3. However it has never been available on the contributor lists like Author, Artist, Director etc. until now. The contributor list entry is more than a simple value list, you can add images, a biography, dates etc You can add a link to a web site. One little known but very useful feature in Readerware is that if you add a link to an artist for example Readerware displays the artist name as a link in the detail view summary panel. As you listen to an album by a favorite artist, you can click on the link to visit their web site and see what they are up to. You can add information about a contributor by clicking on the green arrow icon to the right of the field in the detail view. We have also added a new Bio link to the summary panel in Readerware 3 (Music) to bring up the contributor dialog. In addition to adding more information you can correct mistakes in the name and delete a contributor from the list.
You can only delete one contributor at a time using this approach, that is where the Contributor Editor comes in. Right click in a contributor field and select Edit from the popup menu or use the new Edit menu item. Readerware displays a list of all your contributors, sorted in whatever sequence you selected in preferences. Contributors will appear in the same order as when you sort the table view by artist for example. If you look at the list closely you will see that Readerware displays a use count to the right of the name. This indicates the number of times this contributor is referenced in the database. Contributors with a use count of 0 are not used. Select a contributor from the list and Readerware displays both the display and sort names. You can add, update and delete contributors from the list. Normally you would only delete unused entries from the list, i.e. entries with a use count of 0. Don't delete entries that are still referenced in the database.
You can clean up all unused contributors. Click on Clean Up and all unused contributors, i.e. contributors with a use count of 0 will be removed from the list.
Sometimes you will have multiple entries for the same contributor because they are spelt differently at different sites. For example consider these variations:
Gladys Knight & the Pips
Gladys Knight and the Pips
Gladys Knight
You might find that you have all these variations for the same group. The merge function lets you combine all entries to your preferred choice. Suppose you would like to list all albums by Gladys Knight & the Pips. Start by selecting that entry first, then Ctrl-Click the other entries and click on the Merge button. Readerware will go through your entire database replacing all of these entries with your preferred entry. Once complete you can click on Clean Up to remove the now unused entries from the list.
The Contributor Editor is a powerful new feature that easily lets you clean up your contributor list. As it can update the entire database as it changes contributor entries, it is a good idea to backup your database before running the Contributor Editor.
Vinyl is back!
 Did you know that Saturday April 16, 2016 is Record Store Day.
As you may have heard there has been a real resurgence in vinyl sales. Check out the new releases, many are now being released on vinyl in addition to CD and digital formats. Major record companies are reissuing titles on vinyl and there are many audiophile releases of classic albums coming out every week. Vinyl is back! For many it never went away. You have always been able to catalog your new and old vinyl titles with Readerware and we decided this would be a good time to go over cataloging your vinyl in Readerware and look at some of the new features for vinyl users that we added in this release.
New vinyl titles are being released every week and you can auto-catalog them like CDs, just scan the barcode on the album. You can also drag & drop vinyl releases and we recently added Acoustic Sounds to the list of supported sites. Acoustic Sounds is a leading producer of new vinyl with their Analogue Productions label and their Quality Record Pressings manufacturing plant. They also sell vinyl from all labels in their online store. For those of you buying old vinyl from sites like eBay, Discogs and MusicStack you can catalog them using our music search page. It is amazing how good 50 year old vinyl can sound.
As you catalog your vinyl it is easy to set side and disk breaks in the track listing. It is not uncommon for new vinyl releases to be spread over two discs in order to include all the content on the corresponding CD release. Sometimes a site will just list the tracks in order with no indication of which disc or side a song is on. You can easily add both side and disc breaks in Readerware. Right click on a track number and select from the popup menu. Right click on the first track on side 2 and select Insert Side Break from the popup menu. Readerware will now list the tracks as A-01 ... A-06, B-01 etc. Same for a disc break, right click on the first track on disk 2 and select Insert Disk Break from the popup menu. Readerware will create a new disk and move all the remaining tracks to it.
As you display your music in Readerware you will notice a new summary page. It has been completely redesigned. It starts with the thumbnail album cover and basic album and artist information. There is a new Bio link to bring up the Contributor dialog, you can add an image, biography etc. Don't forget that if you include a link to a web site, Readerware will make the artist name a link so you have easy access to their web site. This is followed by reviews and the full disk and track listing with the large cover art. For vinyl releases we display track numbers with a side indicator so you know what disc and what side of the disc a song is on.
Just in case the old summary page is still included, you can switch back if you prefer it, select the Preferences menu item, then Views, then Detail. Don't forget that you can also create your own summary panel templates, they are HTML based just like the report writer.
Finally we have included an additional summary panel template especially for vinyl fans, this adds the new playback timer. You can select it in preferences. It looks just like the playback controls in a music player except that it doesn't play anything! If you like listening to vinyl just hit the play button when you put the album on. Readerware will follow along listing the current disk, track number and title. It will even alert you when a disc change is coming up. After the side completes the playback timer stops automatically and gets ready for side two. Once you flip the disk just hit the play button again. The playback timer will follow along through all the sides and disks of your album. You always know what is playing, what is coming up and are ready to get up and flip that disk.
In the next article you will learn more about our new support for Windows 10 2-in-1 computers that can operate in tablet mode. Detach the screen when you are listening to your favorite albums. You can control the playback timer by touch, you can scroll the screen etc. Try this, select the thumbnail view and flick upwards with your finger to scroll the screen and watch all your album covers scroll by. Touch to stop at a favorite album. Tap on the album cover to display the popup, double tap to display the album in the detail view.
Readerware on a Windows 10 2-in-1 laptop
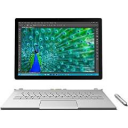
 With the release of Windows 10 virtually every major PC manufacturer is now offering some kind of Windows 2-in-1 laptop computer. A combination laptop and tablet. All these devices include a touch screen which may rotate so that you can stand it up in tent mode, it may rotate completely flat or the screen may detach from the keyboard.
We have been testing Readerware on a Microsoft Surface book which does all of the above. It has a detachable screen which you can use as a standalone tablet. You can also put the screen back on the base backwards and use the device in tent mode or completely flat on top of the keyboard. So how does Readerware work in tablet mode?
Any Windows application will run in tablet mode, you use the existing controls and touch them rather than clicking on them with a mouse. This does all work, but it is not ideal. The buttons and controls in an application may be a little too small or too close together for accurate use on a tablet. If your 2-in-1 comes with a stylus or pen that can help you accurately select controls.
In Readerware you can control the size of the toolbar buttons. Using a larger size can make navigating Readerware on a tablet easier. You can also add more buttons to the toolbar so that more functionality is available on the toolbar and there is less need to use the menu. The big problem we found was scrolling. You can have thousands of books in your database and easy scrolling is very important. The number of books make the scroll bar thumb very small, in fact the entire scroll bar in Windows 10 is very thin and difficult to access on a tablet. A pen or stylus really helps when scrolling.
Of course on a tablet you don't normally have scroll bars at all, you scroll by dragging your finger up or down the display. You can flick upwards with your finger to start the display scrolling. With Readerware 3.51 we have added this functionality to Readerware. You can now scroll the views with your finger, just flick and watch the list scroll by. Touch the screen to stop it scrolling. With your finger still touching the screen you can slowly move it up or down to find the item you are looking for. Don't have a touch screen computer? You can also do it with the mouse, drag the view with your mouse and release the button to watch your database scroll by.
Try flick scrolling the thumbnail view and watch your album or movie covers scroll by. The thumbnail view required some special handling. With a mouse you can hover the mouse over the thumbnail to get a popup describing the item. How do you do that with your finger? You can tap the thumbnail once to display the popup, tap it twice to display the item in the detail view. Use your finger to scroll the summary panel, touch the Home toolbar button to return to the thumbnail display.
If you have a 2-in-1 or touch screen device be sure to check out using Readerware with a touch screen. This is still a work in progress. We were never stumped we could always do what we wanted to from the touch screen, but it wasn't always as easy as it should be. Stay tuned.
Dates in Readerware
 We replaced the date component we have been using in Readerware for years. We had been considering this for some time as there were a lot of problems with the date component. We were concerned about compatibility issues if we suddenly swapped it out.
If you look closely at the new date component you will see a difference but everything works the way you would expect, we don't think you will have any problems selecting a date.
The new component is much better at displaying the date in your local format. A user from Estonia recently reported that he was unable to select a valid date using the old component, the new one handles it perfectly.
If you prefer typing in dates then you will really like the new date component as it accepts dates in just about any format. Here in The US you could manually enter a date as "April 15th, 2016", "Apr 15, 2016" or "4/15/16". You should be able to do the same in your locale, i.e. enter a date in your long, medium or short formats.
Let us know if you run into any problems, but this looks like a huge improvement for everyone.
Spine Labels
 We did more work on spine labels in this release. We added support for two new label sizes:
Vernon 783325 (US legal 1" by 1")
Vernon 15025 (US legal 1" by 1.5")
These labels are high quality foil backed library labels from Vernon Library Supplies.
You can now select the orientation when you print spine labels.
We added a new option to truncate the Dewey Decimal Number when printing. For example this Dewey Decimal Number is from The Library of Congress: 005.2/762. If you select the option to truncate the Dewey Decimal Number Readerware will print it as 005.2. If you print the full number, Readerware will print 005.2762.
We added a new option to print the call number on a single line. For example DS559.46 .H35 1986. Normally we would split the call number over multiple lines:
DS
559.46
.H35
1986
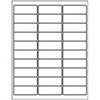
We don't guarantee that every option setting will produce valid labels, you will need to use common sense when picking the orientation and formatting options. For example consider labels like these:

You could select the Portrait option and print the call number on a single line. You could select the Landscape option and split the call number over multiple lines. Either option would probably work well. However if you tried to print the call number on one line in Landscape mode, you would have a real mess on your hands.
Subscription information
You are receiving this newsletter because you joined the Readerware Newsletter mailing list.
To unsubscribe from this newsletter or change your subscription click here.
You can also unsubscribe from this newsletter by replying to this e-mail with REMOVE in the subject line.
This message was sent by Readerware Corporation.
PO Box 1059
Clearlake Oaks CA 95423
Copyright © 2016 Readerware Corporation
