Readerware Newsletter August 2012
Welcome to the Readerware® Newsletter
Readerware 3.15 has been released. Actually there have been two releases since our last newsletter, we will cover both here. New features include image scaling, new database fields and searches and a new jump to feature in the table view. There have been a number of UI changes and some important maintenance. It is recommended that all users upgrade to Readerware 3.15.
New Readerware tutorials.
From the FAQ: Will Readerware run on Mac OS X Mountain Lion?
Readerware 3.15 Released
Readerware 3.15 includes updates for both the desktop and Android versions of Readerware. This is an important upgrade that all users should install as it addresses an issue with the database. We also recommend that all users verify their current database after installing Readerware 3.15.
You can now request that Readerware scale images as they are added to the database. You set the size and Readerware will automatically scale the image for you.
There is a new Keys search, enter an ISBN, UPC, Call Number, item ID etc. Readerware will search all key fields and return the item.
There are a number of UI changes, new toolbar preferences, a new "Jump to" feature in the table view etc.
The full list of changes is available in the release notes. You can also access the release notes from Readerware itself, select the Help->Release notes menu item.
Image Scaling
 Until now Readerware has always taken images as is. You could control the size to some extent by choosing a site with the images you liked best. Websites change and today some sites are using very large images, sometimes too large for a thumbnail image. Readerware 3.15 can scale the images to your preferred size as they are added to the database.
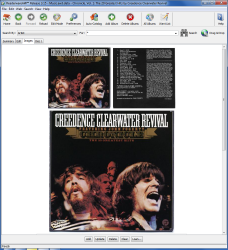
Select the Preferences menu item, then Images. You can turn scaling on or off and you can set your preferred size. You can size the small and large images independently. Readerware will then scale images as they are added to the database regardless of how the image is obtained. Auto-Catalog, drag & drop, copy/paste, a scanned image etc. Readerware automatically preserves the aspect ratio of the image.
If you try and add an image that is too large for the database, Readerware will scale the image automatically. This will happen regardless of the state of the scaling option. It is necessary to ensure that your database only contains valid images.
So how do you decide what is the best size? You can use copy/paste to test out new image sizes. Change the size in preferences then display an item in the detail view, Images tab. Right click on an image and select Copy from the popup menu. Right click again and this time select Paste. Readerware will scale the image to the new size as it pastes it. You can see the new scaled image but the database has not been updated yet. If you want to try again select the Preferences menu item. Readerware will prompt you about unsaved changes, select Don't Save. Using this technique you can try different sizes until you find the one that is right for you.
What about the images already in your database? You can resize those using the bulk editor. Choose an image column and the resize option. Readerware can go through your entire database resizing the images. We do recommend that you backup your database first before you update existing images. Readerware will scale the image to the size you set, enlarging or reducing the size of the image. If you resize your images and decide that the new size is too small, you could just resize them again. However multiple resize operations will degrade image quality. A better approach in this scenario would be to restore your database and resize the original images again. So backup your database before resizing your existing images.
Verifying your Images
For users who have been adding images to the database manually, there is a very important check you need to run. We recommend that all users do this after installing Readerware 3.15.
There was an issue with image size in earlier versions of Readerware 3. It is possible that an image that exceeds the maximum allowed size was added to your database. Once in the database these large images can cause problems and need to be fixed.
Readerware can go through your database checking all your images and resizing any that are too big. You use the bulk editor for this:
- Select the Edit->Bulk Edits menu item
- On the item selection page, select the all items option
- On the Column Selection page, choose the Image column and then set the Verify images option
Complete the wizard. Readerware will go through the entire database checking your images. Most users will see no changes because all their images are valid. However if Readerware reports that some records were updated, you had some large images in your database that have now been scaled. You can browse through the updated items and check the image to make sure it is acceptable.
You should repeat this process for all 4 image columns. This will ensure that your images are valid and will avoid problems with your database. You only need to run the image verification once. After you have cleaned up any bad images the problem will not recur because Readerware will no longer let large images into the database.
New Readerware Tutorials
 There are new tutorials on the Readerware website to help you get started cataloging with Readerware. You can access them from within the program, select the Help->Tutorial menu item.
The new tutorials are short movies that show Readerware 3 in action. You can follow along as you play the tutorial.
Database and Search Changes
 There are some changes to the database in Readerware 3.15:
Volume/Disc Count - This new field is not editable, it is calculated automatically and will contain the number of discs in an album, the number of volumes in a set etc. Now you can easily see the number of discs in an album from the table view, you don't have to click through to the detail view to see this.
Volume/ Disc Title - You can now set a title for each disc, this is useful for box sets that contain several albums for example.
There is also a new search, a keys search. This will search the item key fields like ISBN, Call Number, Book ID, User Number etc. Some users have added their own barcode labels to older books that might not have an ISBN. Now you can select a key search and scan the barcode on a book. The barcode might be an ISBN or a Book ID, Readerware will find it. You don't have to select different searches based on the type of barcode you have on the book.
Tired of the "No Books Found" dialog? There is a new preference setting to only beep when a search does not return any items. No dialog to dismiss. Select the Preferences menu item, then Search List.
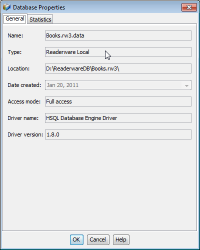
Finally the database properties dialog now includes the database type so that you can easily see what database you are using, a server, local database etc.
UI Changes
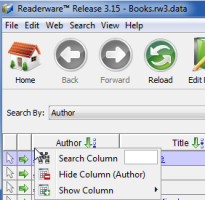
 Another nice feature in the latest version is Jump To. Suppose you have your database sorted by author. You can right click on the author column header and type in the first few characters of the name followed by the Enter key. Readerware will position the search results at that author.
There are additional toolbar preferences. You can display the toolbar as Text and icons (default), Icons only or Text only. You can also add more buttons to your toolbar like Preferences, Auto-Update etc.
A small change in the detail view but a handy one. When you display an item in the detail view, Readerware adds the item to the window title bar. In the music version for example, Readerware will display the title and artist. This can be useful as you move around the detail view, you can always see what item you are working on. When editing album tracks, you can always look at the title bar if you forget which album you are working on.
FAQ: Will Readerware run on Mac OS X Mountain Lion?
 Yes!
Yes!
There are a couple of things to be aware of. As with Mac OS X Lion, you may need to install additional software the first time you run a Readerware application.
Readerware applications for Mac OS X are signed with a third party certificate. This can generate Gatekeeper dialogs when you run a Readerware program. Gatekeeper requires that applications be signed with a certificate issued by Apple. Unfortunately the Apple process takes a while, we have been working on it for several weeks now and the latest from Apple is that it will be at least another two weeks.
Fortunately there is an easy way to setup a Gatekeeper exception for each Readerware application. Right click on the application icon and select Open from the popup menu. Single button mouse users should Control-Click on the application icon. A confirmation dialog will be displayed, click on Open. The Readerware application will be launched and OS X will remember your selection and start the application normally from then on.
We will issue Apple signed Readerware applications as soon as possible. Sorry for the inconvenience.
Readerware support
There is nothing more important than responding to your questions and feedback. You can always e-mail support@readerware.com and expect a prompt reply. You will receive a reply within 12 hours maximum, normally a lot sooner. Unfortunately e-mail communications are not as reliable as they once were. Spam and the various schemes people have dreamed up to combat spam are interfering with normal e-mail communications.
If you have not received a response to your support request within 12 hours, something has gone wrong.
- Check any Spam or message filters, the response may be there.
- Check with your ISP or system administrator. Sites are implementing various defense mechanisms which often block legitimate e-mail.
- If you are using a challenge system, please check to see if your response is being held. We do try and respond to challenge e-mail, but it can mean your response is delayed.
If you have not received a response within 12 hours, don't wait any longer, send a follow up e-mail. If possible try and include an alternate e-mail address. We will re-send your answer from another e-mail server to all addresses you specify.
Obviously Spam is a real problem, but it is important to realize that none of the defense mechanisms are anywhere near 100% accurate. There is nothing more frustrating for you than feeling ignored, you aren't being ignored.
All support e-mail is answered within 12 hours, if you don't get that response, check your anti-spam measures and try again.
Thanks.
Subscription information
You are receiving this newsletter because you joined the Readerware Newsletter mailing list.
To unsubscribe from this newsletter click here.
You can also unsubscribe from this newsletter by replying to this e-mail with REMOVE in the subject line.
This message was sent by Readerware Corporation.
PO Box 1059
Clearlake Oaks CA 95423
Copyright © 2012 Readerware Corporation

